Tianyi Sensor IOT Technology Co., Ltd
Sales Manager:Ms. Emily Wang
Cel,Whatsapp,Wechat:+86 15898932201
Email:info@fengtutec.com
Add:No. 155 Optoelectronic Industry Accelerator, Gaoxin District, Weifang, Shandong, China


Sales Manager:Ms. Emily Wang
Cel,Whatsapp,Wechat:+86 15898932201
Email:info@fengtutec.com
Add:No. 155 Optoelectronic Industry Accelerator, Gaoxin District, Weifang, Shandong, China

Model:TP485
Brand:tianyi
one.Soil pH test application environment description
soil pH test measures soil acidity or alkalinity and can be buried in the soil for a long time to accurately determine the soil's pH level.soil pH test is a soil PH transmitter developed by our company.The transmitter has high accuracy, fast response, stable output, and is suitable for various soil quality.It can be buried in the soil for a long time, resistant to long-term electrolysis, corrosion resistance, vacuum potting, and completely waterproof.
It can be widely used in the detection of soil pH, fine agriculture, forestry, geological exploration, plant cultivation, water conservancy, environmental protection and other fields.
Can be buried in the soil for long-term dynamic testing.
Stable performance and long service life
IP68 waterproof standard
two.Soil pH test technical performance and specifications
1.Technical parameters
| Measurement principle | Electrochemistry (salt bridge) |
| Signal method | RS485 (MODBUS-RTU) |
| Measurement range | 0~14.00 (PH) |
| Measure resolution | 0.01 |
| Measurement accuracy | ±0.1PH, ±0.1℃ |
| Response time | About 10s (98% flowing liquid) About 15s (98% static liquid) |
| Housing material | ABS |
| Temperature compensation | Automatic temperature compensation |
| Cable length | Standard 5 meters |
| Power supply voltage | 12-24VDC (0.4W@12V) |
| Measurement environment | Temperature 0~50℃ (no freezing), <0.2MPa |
| Waterproof grade | IP68 |
| Installation method | Immersive installation, soft soil slurry |
2.soil pH test size diagram

The sensor connector is M12 aviation plug connector 5-core mother seat
three.soil pH test installation
Installation method
Step 1: Use a soil drill to drill holes in the right place
1.Put the 20mm diameter drill vertically on the ground, hold the handle tightly with both hands and press down clockwise and rotate slowly.(Note: Don't use too much force, be sure to turn slowly and a few more turns to prevent the drill bit from running off the hole and breaking into a crooked hole)
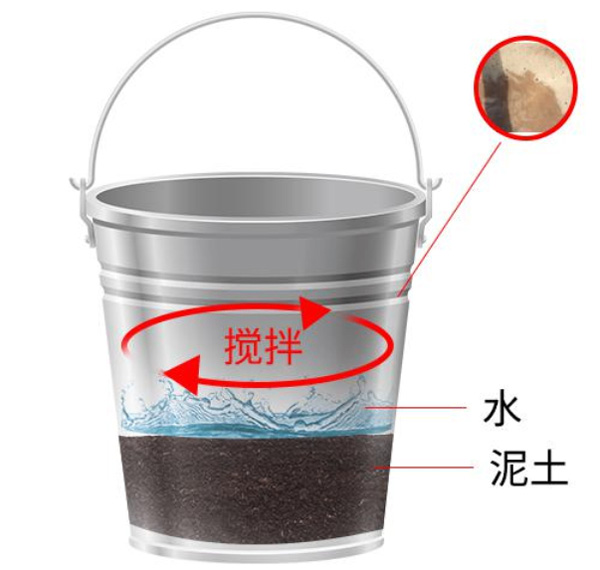
2.Take out the soil drill from the hole and put it into the bucket to collect the soil from the soil drill into the bucket with the following steps and mud.
3.Repeat the above holes and soil extraction, and try to put the sensor into the hole in the process (do not forcefully touch the bottoming of the equipment) to test whether the depth of the hole is suitable; if there is lag, use a soil drill to correct it to ensure that the sensor is placed and removed smoothly; until the hole depth is flush with the installation position marked by the sensor, the hole is completed

Step 2: Making mud
1.Pick out impurities in the soil, gravels, grass roots, soil blocks that are not easy to dissolve, etc.Rub the soil finely to make it smooth.2.Pour in appropriate amount of water and stir thoroughly until it is viscous; the loam mud should not be thicker than "seed sauce"; and the mud should be finished.
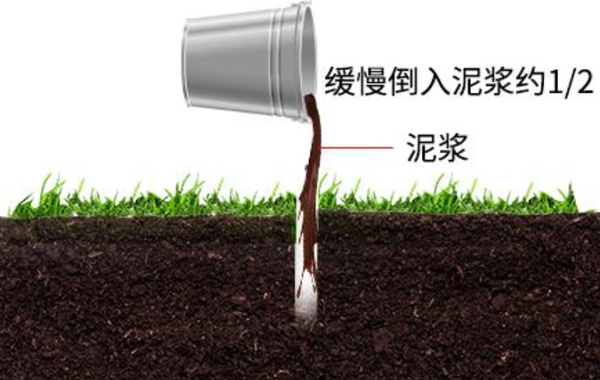
Step 3: Grouting Installation
1.Pour the mud slowly into the hole, about 1/2 of the hole; it can be increased or decreased according to the actual situation.
2.Slowly place the sensor into the hole, rotate slowly in one direction and press down.The speed is too fast, which may cause the bubbles to not be completely discharged.(Note: Do not pull up the sensor during the re-rotating and pressing process to prevent gas from being sucked into the hole again)
3.When the sensor is installed to the correct depth (the zero scale is flush with the ground), some mud will overflow around the equipment and the grouting will be completed.(Note: Remove excess mud outside 3CM around the sensor to prevent agglomeration from affecting moisture infiltration)
Step 4: Installation is completed
Connect the device to the power cord and the 485 communication cable to power on for 1 hour before data collection can be collected.
1.Key points for sand and soil installation
The installation of sand and soil is no different from the standard installation steps of loam.It should be noted that sufficient water is required.Before grouting, pour the water into the hole and wet the entire hole wall until there is excess water at the bottom of the hole.Then follow the steps and slowly pour the mud into the hole, about 1/2 of the hole.The other installation steps are as follows: loam installation.
2.Key points for clay installation
After the installation of clay is completed after the holes are drilled and collected, after cleaning impurities, soak the clay in water for more than 2 hours to soften the clay and facilitate the survival of a relatively uniform mud.After soaking, stir to a viscous shape and grout.The other installation steps are as follows: loam installation.

2.Electrical installation
The cable is a 4-core shielded wire, line sequence definition: red-power cord (12~24VDC)
Blue-ground (GND)
Green-485B Yellow-485A
Before powering on, carefully check the wiring sequence to avoid unnecessary losses caused by wiring errors.Note: The color of the cable may vary slightly depending on the production batch.The specific color of the cable is subject to the silk screen printing.
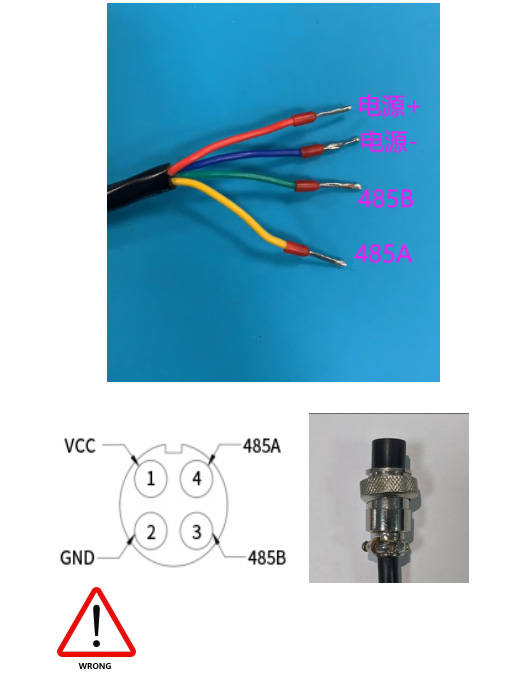
Incorrect wiring may cause permanent damage to the device
Four.soil pH test maintenance and maintenance
1.Use and maintain
When used for the first time or not after a long time, the sensitive bulbs and reference fluid should be immersed in 3.3 mol/L KCI solution for more than 2 hours.
When using, wash and wipe dry with deionized water (or distilled water) to prevent impurities from being brought into the liquid to be tested.1/3 of the sensor should be inserted into the liquid to be tested.
The terminal part should be kept clean and dry.When the sensor is not in use, it should be cleaned.Insert the protective cover with 3.3mol/L KCI solution, or insert the sensor into a container with 3.3mol/L KCI solution.
Check whether the terminals are dry.If there are any stains, please wipe with anhydrous alcohol and continue to use it after drying.The sensor should avoid long-term soaking in deionized water, protein solutions, strong acid and alkali solutions, and acid fluoride solutions, and prevent contact with silicone grease.The sensor that has been used for a long time may become translucent or contain sediments.At this time, it can be washed with dilute hydrochloric acid and rinsed with water.
When the sensor has a long service life, it can be calibrated and corrected by matching the instrument.When the sensor is maintained and maintained by the above method, it means that the sensor has failed.Please replace the sensor.
When camping in the wild, the weather conditions are crucial to the camping experience. The Handheld Weather meter can really show its prowess at this time, helping us to understand weather changes in advance and make preparations accordingly.After we arrive at the camping site, we first take...
The measurement of wind speed and direction is of great importance in many fields, such as weather forecasting, high - speed railways, wind power generation, industrial and agricultural production, and scientific research.In the traditional meteorological field, the measurement of wind speed and dir...
Cultural relics carry the memories of human civilization and are precious non-renewable resources. Meteorology, as an important part of the natural environment, has an intricate connection with the protection of cultural relics.Meteorological conditions are directly related to the preservation...
Nowadays, the demand for meteorological monitoring is no longer limited to fixed locations. In scenarios such as field scientific research, emergency rescue and disaster relief, and temporary event venues, people urgently need a means to obtain meteorological data at any time. As a result, the Porta...


 Get a Free Quote

 Skype
Skype
 whatsapp
 mail
mail